Ok, so you can compress and extract files with WinRar, and you think your cool, right? Not. In this tutorial, I will explain some of the features many of you WinRar users don't have a clue about.
WinRAR is one of the most popular compressing tools which is used to reduce the size of files which allows you to send large file over email or
[color:8129=blue !important][color:8129=blue !important]popular [color:8129=blue !important]file sharing service. Winrar is similar to
[color:8129=blue !important][color:8129=blue !important]winzip but with additional functionality. So in this post I am putting down my hands on experience which will help you to know how to use winrar in a productive way.
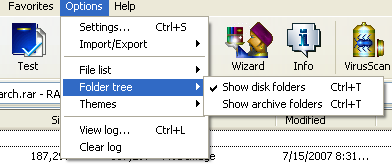
Enable Explorer-like viewSingle pane view is the default view, using that you will have to keep changing folders one by one to reach your file. But there is an easy way. One the winrar interface, goto “Options > Folder Tree > Show Disk Folder”. This will give you an explorer like window and selecting a file is easy now.
 Enable Detail View
By default, you will get to see list but we need to see the details from time to time. “Goto “Options > File List > Details”
Check how much will be the compression and how long will it take to compressThis a very unique feature of Winrar. In case you have a huge folder structure to zip, how do you know how much it can be compressed and how much Winrar will take it to compress. Winrar has an inbuilt functionality which can help you find that.
- Select one or mutliple file which you want to compress, then on the winrar look for an “Info” Tab.
- Click that and you will get another window with 4 tabs.
- The first tab contains an “Estimate Button” . Clicking in this , the tool will tell you how much your data can be compressed in percentage and how much time will it take to compress.
- This is extremely useful as it will save a lot of time of yours instead of sitting and waiting it to finish.
 Split Files using Winrar
What would you do if the compression measurement tells you that size can not be compressed more than 90% and size is too big either to fit on cd or mail. Winrar acts more than a compression tool. Here is how you can use it to split.
- Choose a file or folder you want to split.
- [color:8129=blue !important][color:8129=blue !important]Right [color:8129=blue !important]clicking on it and click “Add files to archives”
- It opens a tab, now you need to find “Split to file, bytes” drop down menu which is present at the lower part.
- Either you can enter tha value in bytes or select a predefined format like, 1.44 Mb floppy, CD Rom, DVD or even auto detect. The auto detect feature can check the destination space and split files according to that.
- Now archive it. You will see a list of files generated which are according to your need.
 Make a Self Extracting archive:
Its a general problem that if I send you a winrar compressed archive you might not have the same
[color:8129=blue !important][color:8129=blue !important]software to open it or the worst you don’t have any compression tool.
So what can you do? Easy, You can create a self extracting archive which will act like the softwares which get installed in one step.
- Click on Existing file you want to compress and make a normal archive.
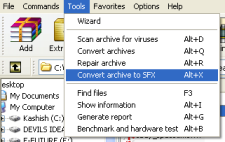
- Now select the archive you just made, “Go to Tools > Convert archive to SFX”
- One more way is while creating an archive, you can just ask it to make an SFX.
 Compress and Mail
Winrar also allows you to send any file on mail by automatically compressing and then attach to mail. There is a
Compress and [color:8129=blue !important][color:8129=blue !important]email feature which has to be enabled if its not.
- Go to Options > Settings .
- It opens up another screen with lot of tabs. Click on the tab named Integration
- On the tab look for a button with label Context Menus. Click that
- This will open another window, which shows the list of features which pops up when you right click a file.
- Enable the Compress and email by checking it.
- Now right click on any file and you will see the menu enabled.
 Change The Temporary Folder
Winrar requires to use a temporary place when it tries to compress a file. By default its located somewhere in C drive. If you don’t have much space there, you can always change the location.
- Goto Options > Settings .
- This opens up another scree with tabs, Now go to Paths Tab.
- Click on “Choose folder for temporary files” and select a path which suits you.
Winrar is not just a zipping tool, it has many
[color:8129=blue !important][color:8129=blue !important]additional [color:8129=blue !important]features which can be used to create a professional
[color:8129=blue !important][color:8129=blue !important]zip [color:8129=blue !important]files and many others. Yesterday
we talked about some unusual features of winrar which is not commonly used. Why not because most of the time we just need to compress or de-compress.
Lets consider a case, where you want to send your client or a friend some set of files which should automatically install and all he or she has to is one click. We might not know but its called as installer. Now suppose when you download any software, it has an exe which does all job for you right?. Thats what we are going to learn now.
Create Basic installer with winrar
- Create a archive file or select a file for which you want to create installer.
- Right click on it and go to “Add Files to archives“
- It will open a window where you need to check the option “Create SFX Archive”

- Then Goto Advanced tab of same window and Click on SFX Options button.
- On clicking, it will popup another window which gives you an extensive set of options to customize your installer.
Customize Basic Installer :
- General : This asks you for the path where the installer will de-compress files to. You can even choose to run a program ( which could be a music file or something else).
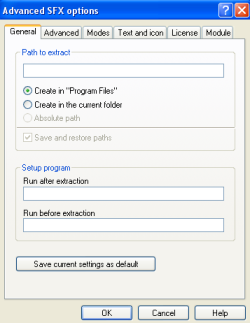
- Advanced: This options is essential if you are continuously upgrading your [color:8129=blue !important][color:8129=blue !important]software and clients need an update.
- You can delete older files before the installer is initialized.
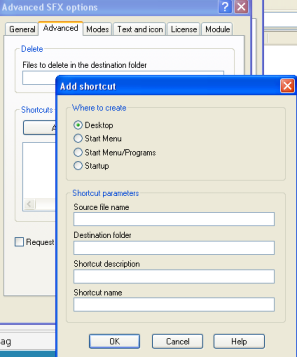
- You can create shortcuts to [color:8129=blue !important][color:8129=blue !important]desktop or start menu, Start menu/ Programs or even startup. You can even pass some optional parameter if your software requires it.
</LI>
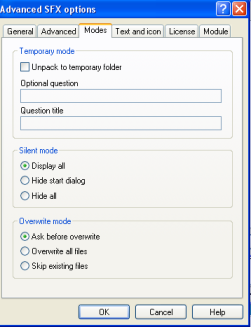
Modes: These modes are specially require if you need to keep the client in mind. Here you can set
If it has to use temporary folder
Do a silent installation without asking
Overwrite options – Complete, ask or skip.
</LI>
Text and [color:8129=blue !important][color:8129=blue !important]Icon : Now if you are creating a professional installer you need to add Title images and text so people don’t thinks its a [color:8129=blue !important][color:8129=blue !important]spam. Check the image.
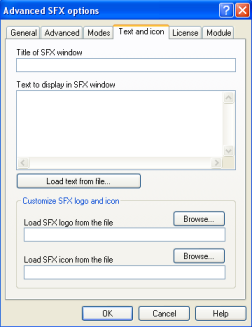
License: You can even add your own license to give it a final touch of professionalism. This can be useful if you don’t want others to take away your rights.

Easy!!! You have your own installer and without much of problems. If you follow the images and instructions properly.
Resources :
- Download Winrar
- Windows and [color:8129=blue !important][color:8129=blue !important]Mac [color:8129=blue !important]OS [color:8129=blue !important]X, Dos, Linux, Free BSD supported
- Available in trial or buy packages
